Getting started
Cosma is a command-line tool and works with plain text files. If you are unfamiliar with these things, the first two sections of this guide will help you get started.
If you already know your way around a terminal and text editor, you can go straight to the third section, which is a step-by-step tutorial to creating your first visualizations with Cosma.
Go to the fourth section for tutorials on the more involved or advanced processes supported by Cosma, such as using tabular data, bibliographic data, and customizing the appearance of output files.
1 Using the command line
Cosma is a command-line tool: instead of a dedicated graphical user interface (GUI) with windows, menus and buttons, it uses a command-line interface (CLI) which consists in typing textual commands into another program called a terminal.
% cosma modelize --project otletosphere
[Cosma v.2.0.0] Otletosphere otletosphere.yml
Building cosmoscope… (source type: csv)
Cosmoscope generated (128 records)
You can learn the basics of this kind of interface in a matter of minutes, and Cosma has only a few commands, with a cheat sheet easily accessible in case you forget them. Also, some features of Cosma are designed to simplify your interaction with the terminal. So once you know your way around a terminal, using Cosma should be quick and easy every time.
1.1 Opening a terminal
On macOS, open the “Terminal” application from “Applications/Utilities”.
On Windows, open either the “Command Prompt” or “Windows Powershell” application. The latter is a more modern terminal, requiring less manual intervention. (For instance, if you use “Command Prompt”, you may want to type chcp 65001 then press Enter to set the encoding to UTF-8.)
On Linux, search for an application called “Terminal” or which includes “Terminal” in its name:
- In Unity, use the search function on the “Dash”, and search for “Terminal”. Or, use the keyboard shortcut “Ctrl-Alt-T”.
- In Gnome, go to “Applications”, then “Accessories”, and select “Terminal”, or use “Ctrl-Alt-T”.
- In XFCE, go to “Applications”, then “System”, then “Terminal”, or use “Super-T”.
- In KDE, go to “KMenu”, then “System”, then “Terminal Program (Konsole)”.
You should now see a window with a prompt and a blinking cursor. The prompt can be just a symbol like % or $, but it probably includes more information, such as your username and directory. This depends on your operating system (OS) and its shell: the outermost layer of the OS, to which we pass commands through the terminal.
user@computer:~$
This is what Bash looks like on Linux. Bash is a type of shell. On macOS, Terminal uses either Bash or Zsh (from macOS 10.15). On Windows, you have Command Prompt or PowerShell. This doesn’t matter much in the context of Cosma, which works the same regardless.
For the rest of this guide, we’ll use a simplified terminal example based on macOS’s terminal, with just this prompt:
%
Lines which begin with % represent your input. Lines which don’t begin with % represent the terminal’s output, where programs write messages in reaction to your commands.
That’s it: you know enough to install Cosma! If you haven’t already, go to the Installing page and follow the instructions there. Then come back here.
To verify that Cosma is installed, type the following then press Enter:
cosma --version(Note the space between cosma and --version.)
You should see a message telling you which version of Cosma is installed:
% cosma --version
2.0.0
Congratulations, you’ve successfully used a command!
1.2 Commands
A command usually begins with the name of a program: in the previous example, the program is cosma. Note the lowercase: file systems are case sensitive, and command-line programs usually have lowercase names.
Optionally, a command can be followed by instructions for that program. In the example above, the --version flag tells Cosma to display its version number. Flags are predetermined. You can usually learn about available flags for a specific command by reading the corresponding program’s user manual.
Sometimes a command or a flag needs additional information which is not predetermined but specified by the user. This is called an argument. Flags that take an argument are called options.
In a terminal, spaces matter just as much as the difference between lowercase/uppercase. Program names and flags must be separated by at least one space. Omitting the space between cosma and --version will result in the terminal trying to run a program named cosma--version, which probably doesn’t exist.
Writing commands can get repetitive, and when they get lengthy it becomes down right tedious. But you can save time. Use the up-arrow key to go back through the history of commands you have previously sent. When you’ve found the command you want to send again, press Enter.
1.3 Where am I?
Opening a terminal is just like opening your regular file explorer: you land somewhere in the file system, usually your home directory. In the following sections, we’re going to check where we are and start moving around, but before this, take a moment to open a file explorer window beside your terminal. You can use it to check that what you see in the terminal matches what you would see in the file explorer.
To know where you are, if you’re on Linux or macOS, use the pwd command. On Windows, use the echo %cd% command instead.
% pwd
/Users/username
pwd stands for “print working directory”. For the machine, printing means writing text in the terminal window. The working directory is the directory where you are currently located; every time you move, the working directory changes to where you have moved.
pwd outputs a path, which is a textual representation of where the working directory itself is located within the file system. Some terminals display the working directory’s path before the prompt, so pwd is not always needed to know where you are.
To list the contents of the current working directory, use the ls command. This prints a list of directories and files.
For the rest of this guide, we’ll use macOS-style paths in our examples. For example, the home directory will be designated like this:
/Users/usernamewhere username should be replaced by your actual user name. On Windows, the equivalent would look like this:
C:\Users\username1.5 Running Cosma
Cosma works by reading data and creating an output file (the “cosmoscope”) according to a series of parameters. The way you make this work is by using configuration files. For each project, you create a configuration file and fill it with information: first and foremost, the path to the data; then various parameters that govern the behavior of Cosma for this data (including where to create the output file). Then you run the cosma command while pointing to this configuration.
Two approaches can be taken with these configuration files. Depending on which you choose, it changes the way you interact with the terminal.
The first approach is to run cosma in a directory where a configuration file is located. This is called a local configuration file. Local configuration files must always be named config.yml. In this approach, you must first move to the directory containing the configuration, then run cosma. For example, if you have a directory called my-graph in Documents:
% cd Documents/my-graph
% cosma modelize
[Cosma v.2.0.0]  /Users/username/Documents/my-graph/config.yml
Building cosmoscope… (source type: directory)
Cosmoscope generated (128 records)
(modelize is one of the five sub-commands of cosma. It is used to create the cosmoscope. You can read more about the commands in the User manual.)
The other approach is to use a special folder, your Cosma user data directory, to you put configuration files in. These files are called global configuration files. They must have names other than config.yml. For example, you can have the same configuration as in the example above, except it’s called my-graph.yml, and it is now located in your user data directory. You can then run cosma with the --project name option, where name is the name of that file. With this approach, the cosma command can be run from anywhere:
% cosma modelize --project my-graph
[Cosma v.2.0.0] My Graph /Users/username/Library/Application Support/cosma-cli/my-graph.yml
Building cosmoscope… (source type: directory)
Cosmoscope generated (128 records)
The first approach is useful when working with others or on several computers, because it does not require any setup beyond installing Cosma. For each project, put all files required by Cosma in a single repository and share it. On each machine that has access to the folder, navigate to it and run Cosma.
Conversely, the second approach is useful when working alone or on a single computer, because you can set up global configuration files and never have to navigate your file system with the terminal.
If you haven’t installed Cosma already, visit the Installing page and follow the instructions there. Then come back here: in the next section, we’ll learn about plain text in order to create data and configuration files for Cosma.
2 Working with plain text
Cosma uses plain text files for everything, from data to settings. Plain text is simple, reliable but demands precision. It revolves around a handful of concepts, which only take a few minutes to learn. But doing things in plain text involves different languages, each with its own set of quirks. So, contrary to the command line, you don’t really need a guide to start using plain text, because it is very intuitive; however, it can help you avoid common pitfalls further along the way.
2.1 What is plain text?
You have probably already seen a computer file with a name ending in .txt. You may also have opened such a file with a program like Notepad (Windows), TextEdit (Mac) or Gedit (Linux). What you have come across on these occasions is plain text.
The expression “plain text” is somewhat deceptive. “Plain text” can be plain-looking-but-actually-not-plain text:
old pond
frog leaps in
water's sound
“Plain text” can also be tabular data:
Date,Open,High,Low,Close,Volume,Adj Close
2018-06-01,569.16,590.00,548.50,584.00,14077000,581.50
2018-05-01,584.90,596.76,522.18,577.73,18827900,575.26
2018-04-02,601.83,644.00,555.00,583.98,28759100,581.48
“Plain text” can also be an image:
<svg style="display: none;">
    <symbol viewBox="-3 -3 30 30" id="sun">
        <circle cx="12" cy="12" r="5"></circle>
        <line x1="12" y1="1" x2="12" y2="3"></line>
        <line x1="12" y1="21" x2="12" y2="23"></line>
        <line x1="4.22" y1="4.22" x2="5.64" y2="5.64"></line>
        <line x1="18.36" y1="18.36" x2="19.78" y2="19.78"></line>
        <line x1="1" y1="12" x2="3" y2="12"></line>
        <line x1="21" y1="12" x2="23" y2="12"></line>
        <line x1="4.22" y1="19.78" x2="5.64" y2="18.36"></line>
        <line x1="18.36" y1="5.64" x2="19.78" y2="4.22"></line>
    </symbol>
</svg>
The gist of it is this: plain text is not a format in the sense of PDF, DOCX or HTML; it is more generic, a kind of meta-format. A plain text file is a file whose binary code (the underlying sequence of 0’s and 1’s) translates only into textual characters, as opposed to pixels or sounds for example. In other words, it is a file that contains only characters. This can be used to create files in all sorts of specific formats.
2.2 Why use plain text?
We’ve designed Cosma around plain text because it offers a variety of advantages for knowledge work. There’s no money in marketing plain text, because it’s basically free to use, so its notoriety is unfairly low compared to its usefulness. But plain text is awesome. Here are a few paragraphs to explain why.
2.2.1 Simplicity and lightness
Plain text can be objectively characterized as simple (low complexity) and light (low volume). From these two characteristics, some advantages already follow:
- Because it is simple, it is easy to use: simple format, simple interactions. But simple does not mean limited: plain text is very expressive. For machines, this simplicity also makes it easy to handle. In particular, it is easy to save and synchronize between different devices; it is perfect for versioning.
- Because it is light, it is efficient: all actions are faster (opening, editing, saving…). It is also portable, because it is quick to copy, saves storage space, and can be used as is on any operating system.
2.2.2 Freedom
Plain text is not proprietary: you can freely use it, distribute it, know how it works and modify it (these are the four fundamental freedoms of free software). The most widely used character encodings (see Encodings below), such as ASCII and UTF-8, are international standards adopted by the ISO and the IETF and can be used freely. This has several consequences that benefit users.
- It promotes competition between software, resulting in a great diversity of tools, which allows a greater freedom of choice.
- It increases the lifespan of data. There will always be a free and open source tool to replace a proprietary tool. This decreases the risk of being locked out of your data because the only tool that could interpret it becomes expensive or disappears.
2.2.3 Stability and reliability
ASCII has been around since the 1960s. UTF-8 since the 1990s. All things being equal, plain text is a more stable and therefore more reliable standard than the more recent proprietary alternatives. A text file created in the 1970s is as readable today as it was then; hopefully, this guide will be as readable in the 2070s as it is now.
2.2.4 Versatility
Plain text is incredibly flexible in the uses it allows. We’ve mentioned a couple examples (poetry, tables, graphics) but there are many more. Think about XML: a generic technique whose expressiveness allows for a potentially infinite number of applications. Plain text is just like that, and it also facilitates conversions between formats.
2.2.5 …Stoicism?
Derek Sivers has a page on plain text from a stoicist perspective. He suggests that we should increase our autonomy from technology, especially by favoring formats over features, and by having tools that allow us to work offline. According to him, we are willing to depend on particular software, especially because it offers specific functionalities that we consider indispensable. In reality, many needs can be met by simple but expressive and therefore versatile techniques. For example, plain text can replace Word, Evernote or Notion. Another example: more and more tools are offered as software-as-a-service (SAAS), usable only online; Sivers argues that we don’t always have an internet connection, and above all that disconnection can be desirable in certain contexts, as it favours concentration. It is therefore useful to have tools that are compatible with disconnection. Plain text fits into this logic.
2.2.6 Scientific plain text
Because of all these advantages, plain text is widely used in science. Over time, shared efforts have produced invaluable resources, including formats that provide interoperability. We’ve chosen to stay very close to standard formats within that ecosystem, so that we can maintain Cosma for as long as possible, and so that your data stays useable for as long as you need it.
Now that you’re sold (hopefully) on why we chose to design Cosma around plain text, let’s move on to the core concepts it is based on. Knowing these will help you avoid common pitfalls when using plain text.
2.3 Encodings
A plain text file contains only characters. This makes us think about print characters (letters, numbers, punctuation) but it can include different alphabets as well as symbols, emoji and more. What “characters” means depends on the character encoding.
An encoding is a standard that defines which characters can be used in a file. Not all standards code the same characters. ASCII, for example, is an American-centric and rather old standard that encodes only 128 characters, excluding not only accented characters but also all non-Latin alphabets (Arabic, Cyrillic, Hebrew, ideograms…). On the other hand, UTF-8 is a more recent international standard that codes all Unicode characters, including the ones in ASCII and many others (non-Latin alphabets, symbols, emoji…).
ASCII, with its 128 characters, is the smallest common denominator of encodings for plain text. It is still used, which guarantees some compatibility with older documents and software. UTF-8, with its millions of characters, is the highest common denominator. With the globalization of exchanges, it tends to replace ASCII as the “universal” standard. The first 128 characters of UTF-8 are the same as those of ASCII and are coded in the same way: any text in ASCII can therefore also be considered as text in UTF-8.
Unless the situation calls for otherwise, it’s recommended to use UTF-8, and it’s what Cosma assumes your data will use.
2.4 Formats, languages and file extensions
Speaking about plain text involves the words “format” and “language”. For example, we might say that a doc.xml file is in the XML format but we speak of the XML language. What is the difference? And what does this have to do with the .xml file extension?
A format is a series of conventions, of formal rules, which define how to structure something, how to give it shape. It predates computing. “Letter” and “A4”, for example, are paper formats. The Cornell method is a note-taking format.
A computer language is a format enforced through writing rules. There is a parallel with natural languages: a computer language also has a grammar (its syntax rules) and a vocabulary (the terms and characters that have a special meaning in the context of its use).
Let’s take an example. Here’s some text:
A format is a series of conventions, of formal rules, which define how to structure something, how to give it shape.Let’s transform this into HTML (the HyperText Markup Language). For this, we use the HTML syntax, which combines characters like <, > and / with keywords such as p for paragraph and strong for strong emphasis.
<p><strong>A format</strong> is a series of conventions, of formal rules, which define how to structure something, how to give it shape.</p>We can say this text is written in the HTML language or that its format is HTML. Both statements are true. This reflects the dual nature of a computer language: a format, implemented by writing.
Not every format is associated with a language. For example, I can say that doc.txt is a TXT file but there is no such thing as a TXT language. The txt file extension is declarative only. Changing it does not change the file format. Only the content of the file determines its format. The extension serves only to suggest to the machine a program to open the file, if the extension is known and a default program is associated with it.
A file extension can be any string. doc.txt could be called doc.text or doc.thing. A machine cannot know all possible extensions, so this information is often meant for humans as much as machines.
As an example, Cosma reads two types of plain text files: Markdown (with the md extension) and CSV (comma-separated values, with the csv extension).
The extension .txt has a special meaning: it is often used to indicate that the file is in plain text, without specifying a particular language. Most machines recognize this extension and open the corresponding files with a particular type of software: a text editor.
2.5 Text editors
In the same way you would open a PDF in a PDF reader, or a web page in a web browser, plain text has its own dedicated editing environment: text editors. Text editors should not be confused with word processors. Text editors are only capable of displaying the contents of plain text files. “Text editor” is a broad category, ranging from small utilities to heavily specialized writing environments. A good text editor provides control over encoding, format, language, file extensions. It often includes facilities for text manipulation, such as search-and-replace functionality.
If you’re going to use plain text, one of the first things to do is to use a proper text editor. Earlier we mentioned Notepad on Windows. It’s serviceable but consider using the excellent Notepad++ instead. On macOS, we mentioned TextEdit. Be careful not to use it in Rich Text mode when you edit plain text files. Better still, consider replacing it with BBEdit, which has a forever Free Mode that beats most commercial software.
2.6 Formats used by Cosma
Cosma uses several plain text formats simultaneously. Below is a short introduction to each, with a list of common pitfalls to avoid. Links to the User manual provide access to exhaustive information on how each format is used in Cosma.
2.6.1 Markdown
Markdown is a markup language. It is used to add semantic information to text, in a way that remains both easy to read and to write. It was originally meant has a shorthand for HTML and so it has only a handful of features: titles, emphasis, hyperlinks, blockquotes and a couple other things.
# A short Markdown example

Here are few lines of Markdown. Above is a level 1 title. Paragraphs need no markup, just empty lines between them. Emphasis can added with *asterisks*.

Check the following resources:

- The [CommonMark tutorial](https://commonmark.org/help/) will help you learn all about Markdown in 10 minutes.
- Wikipedia's [Markdown page](https://en.wikipedia.org/wiki/Markdown) will give you more information about Markdown, including its history.
Markdown is not tricky at all. Just keep your markup simple (don’t nest emphasis or lists too much) and consistent (don’t add too many spaces or newlines where they’re not needed).
Check the User manual for more info on using Markdown with Cosma.
2.6.2 YAML
YAML is a data serialization language. It is used to stored structured data.
Cosma uses YAML in two ways.
Firstly, YAML is used to add metadata at the top of a Markdown file. Let’s use our previous example to add a title, author name, keywords and language code:
---
title: A short Markdown example
author: Arthur Perret
keywords:
- markup
- plain text
lang: en-US
---

Here are few lines of Markdown. The level 1 title is gone, replaced with a YAML key-value pair.

You can write code between backticks in Markdown. For example, the metadata used to express the title in the YAML header above is `title`.
Secondly, YAML can be used to create configuration files for Cosma. In the example below, we set the data source, turn on the automatic history and define colors for a couple of categories used in our data:
data: '/Users/user/Documents/my-graph/'
history: true
record_types:
  concepts: #aa0000
  people: #e1e1e1
YAML looks easy, with its simple key: value pairs. But structure is enforced by white space, which makes it trickier than it looks, especially when you’ve just discovered plain text. Here are a few examples of common pitfalls:
- In a
key: valuepair, there must not be a space before the colon but there can be any amount of spaces right after. - There cannot be tabulations at the beginning of lines. Indenting lines must be done with spaces.
- The
---delimiter is three dashes on a line, with no other characters (including spaces). - Empty lines break lists.
YAML is a strict language: one character out of place will stop programs dead in their tracks. Since most of YAML writing rules involve invisible characters, beginners often don’t see where they made a mistake. You can use a text editor that includes the option to show invisible characters to check your YAML.
Check the User manual for more info on using YAML with Cosma for metadata and for configuration.
2.6.3 Wiki links
Cosma interprets wiki links. As the name suggests, these are used in wikis: a name between double brackets creates a link to the corresponding wiki page.
Paul Otlet is a pioneer of the French movement of [[documentation]], the founder of the [[Mundaneum]]. With [[Henri La Fontaine]], he co-created the [[Universal Decimal Classification]].These aren’t as tricky as YAML. The question is what to put between brackets. Cosma allows either titles or identifiers, with the possibility of customizing the link text.
Say you have the following file:
---
title: Documentation
id: 123
---

The word "documentation" designates both the act of documenting and the product of this action.
To make a link to this file, you can write either:
Paul Otlet is a pioneer of [[documentation]].or:
Paul Otlet is a pioneer of [[123|documentation]].The second approach is more cumbersome but future-proof: even if you change the title of the file named “Documentation”, the link won’t break as long as you don’t change identifiers.
Check the User manual for more info on using wiki links with Cosma.
2.6.4 Citations
Cosma understands a limited subset of Pandoc’s citation syntax, which you can use to include references:
Otlet regarded classification very highly:

> "Classifying is the highest of intellectual operations" [@otlet1934, 379].
The syntax is rather simple. The trick is what is required for Cosma to transform the above into the following:
Otlet regarded classification very highly:

> "Classifying is the highest of intellectual operations" (Otlet 1934/2015, p. 379).

# Bibliography

Otlet, Paul (2015). Traité de documentation. Le livre sur le livre. Bruxelles: Impressions nouvelles. Originally published in 1934.
Cosma does this if you provide it with bibliographic data, styles and localization. The setup to create the bibliographic data can be a bit involved (we use Zotero with Better BibTeX) but it works reliably.
Check the User manual for more info on using citations with Cosma.
3 Getting started with Cosma
If you’re here, you’ve installed Cosma and want to try it out. The following guide will help you create data, configure Cosma and create your first visualization.
3.1 Before getting started
Make sure you have access to a terminal, a text editor and a web browser.
If you’re on macOS and use TextEdit (the default text editor): open TextEdit’s Preferences, change the default format to plain text and turn off the option to automatically add a .txt extension when saving plain text files. (Better still, try a dedicated plain text editor like BBEdit.)
Set up your file explorer so that you can see file extensions.
3.2 Creating a local project
For our first tutorial, we’re going to create a local project. We’ll put everything in one directory; using the terminal, we’ll move to this directory and run cosma to create a configuration, some data, and an output file.
3.2.1 Setting up a local project
Choose an appropriate location in your file system and create a new directory called cosma-test (note the lowercase).
Inside cosma-test, create a directory called data and another one called export. We’ll create data for Cosma in the first one, and generate the visualization in the second one. We’ll put other useful files in cosma-test (we’ll refer to it as the root of the project).
Open a terminal and move to cosma-test. You can use pwd (or echo %cd% on Windows) to check that you are there, and ls to check that you can see your two sub-directories. If you’ve created cosma-test in the Documents subdirectory of your home directory, your terminal will probably look like this:
% cd Documents/cosma-test
% pwd
/Users/username/Documents/cosma-test
% ls
data export
3.2.2 Creating a local configuration file
Run the following command to create a new configuration file:
cosma configCheck your file explorer window or use ls in the terminal: you should now see a file named config.yml in cosma-test.
Open config.yml with your text editor. You should see about fifty lines of YAML, beginning with this:
select_origin: directory
files_origin: ''
…
These are the default settings for a new project in Cosma.
The first line tells Cosma that your data will consist of Markdown files in a directory:
select_origin: directoryThe second line tells Cosma where the data is. For now, it’s blank:
files_origin: ''Let’s edit this second line to tell Cosma where our data is going to be located. On Linux and macOS:
files_origin: ./dataOn Windows:
files_origin: .\dataThis is a relative path. A relative path starts at the same root as the file it’s written in. Since we’re writing in config.yml and it is located in cosma-test, the root of the path is cosma-test. To make it explicit, we use the dot . which means “here” (relatively to config.yml). Then we add the name of the data folder, with a slash / (or \ on Windows) to separate directory names.
We’re doing this because if you move the folder around, this path will still work, as it is relative to the folder itself and not where the folder is located within the file system.
Let’s tell Cosma where we want it to create the output file. On Linux and macOS:
export_target: ./export/On Windows:
export_target: .\export\(Note the trailing slash. Cosma needs it.)
That’s it: this is enough to start creating data.
3.2.3 Creating data
Cosma is a graph visualization tool: your data will be made of things and relationships between these things.
This abstraction is built on top of plain text files. Cosma can read two kinds of files: Markdown and CSV. In the case of Markdown, each thing is described in its own dedicated file, written in Markdown. In the case of CSV, a single file contains all the things. Here, we’re going to create Markdown files.
Let’s create our first file. We could do this manually but let’s use Cosma’s built-in command for generating Markdown files:
cosma recordWhen you press enter, Cosma will ask you for a title:
% cosma record
title (required):
Type Evergreen notes then press Enter.
Cosma will then ask you for one or more types. Type concept then press Enter.
Cosma will then ask you for one or more tags. Press Enter to skip this.
You should now see a confirmation that a file called evergreen-notes.md has been created in data.
You should also see a warning about concept not being defined in the configuration. Warnings are important but they don’t stop Cosma from working. Let’s ignore it for now, we’ll come back to it later.
Open evergreen-notes.md in your text editor. You should see something like this:
---
title: Evergreen notes
id: 20230515104916
type: concept
---
Add another newline so there’s an empty line between the second --- delimiter and the rest of the file. This is not mandatory, it just makes it easier to separate the YAML header and the rest visually. Then copy and paste the following text at the bottom of the file:
Evergreen notes are written and organized to evolve, contribute, and accumulate over time, across projects. This is an unusual way to think about writing notes: most people take only transient notes. That’s because these practices aren’t about writing notes; they’re about effectively developing insight: “Better note-taking” misses the point; what matters is “better thinking”. When done well, these notes can be quite valuable.(This is from Andy Matuschak’s working notes. Andy is an important contributor to the ecosystem of tools for thought. If you don’t know his work, check his website.)
The file should now look like this:
---
title: Evergreen notes
id: 20230515104916
type: concept
---

Evergreen notes are written and organized to evolve, contribute, and accumulate over time, across projects. This is an unusual way to think about writing notes: most people take only transient notes. That’s because these practices aren’t about writing notes; they’re about effectively developing insight: “Better note-taking” misses the point; what matters is “better thinking”. When done well, these notes can be quite valuable.
If you have only just discovered plain text, please note that creating files with the cosma record command is safer than creating them by hand. Why? Because the metadata at the top of each file must be written in YAML.
In case you skipped the section on YAML further up on this page, you should know that unlike Markdown, which is a permissive markup language, YAML is a data serialization format, and these tend to be unforgiving when it comes to syntax errors. And in YAML, the data is structured by invisible characters (spaces, newlines): this makes it very clean and nice to read, but it also means that it’s easy to make hard-to-spot mistakes if you don’t know the syntax rules.
Using cosma record allows you to create files with automatically generated YAML metadata, eliminating the risk of making mistakes.
Let’s create a second file. Run cosma record again. Remember, since you already used this command, you can press up-arrow to find it back instead of typing it again.
When Cosma asks for a title, type Evergreen notes should be atomic.
When Cosma asks for one or more types, type insight.
When Cosma asks for one or more tags, press Enter to skip this.
You should now have another file in data, called evergreen-notes-should-be-atomic.md. Again, ignore the warnings for now.
Open evergreen-notes-should-be-atomic.md and add the following text to it:
Evergreen notes should be atomic. It’s best to create notes which are only about one thing—but which, as much as possible, capture the entirety of that thing.The file should now look like this:
---
title: Evergreen notes should be atomic
id: 20230515105059
type: insight
---

Evergreen notes should be atomic. It’s best to create notes which are only about one thing—but which, as much as possible, capture the entirety of that thing.
Now, let’s add a link. In the file titled “Evergreen notes should be atomic”, edit the first sentence (not in the YAML header but below it) by adding double brackets around Evergreen notes. Then, inside the double brackets and before Evergreen notes, add the identifier for that record, followed by a vertical bar |. You can find the identifier for Evergreen notes in the YAML header of evergreen-notes.md, after id: .
---
title: Evergreen notes should be atomic
id: 20230515105059
type: insight
---

[[20230515104916|Evergreen notes]] should be atomic. It’s best to create notes which are only about one thing—but which, as much as possible, capture the entirety of that thing.
The id used in the link in the above example is 20230515104916. It’s probably different from the one you see in your version of evergreen-notes.md. This is normal: when creating a record, Cosma generates its 14-digit identifier by taking a timestamp (year, month, day, hour, minute, second). Just replace 20230515104916 by the id you see in your version of evergreen-notes.md.
We now have two things and a link between them: it’s a graph! Let’s visualize it.
3.2.4 Creating a cosmoscope
In your terminal, check that you’re still in cosma-test, then run the following command:
cosma modelizeYour terminal should look like this:
% cosma modelize
[Cosma v.2.0.0]  /Users/username/Documents/cosma-test/config.yml
Building cosmoscope… (source type: directory)
Cosmoscope generated (2 records)
Report: 2 warnings
/Users/username/Library/Logs/cosma-cli/logs/20230503150704.html
We should now have a cosmoscope.html file in the export directory, but what’s this about a report and two warnings? You may have guessed it: it’s to do with those warnings Cosma gave you when you created the Markdown files.
Look at the last line of the message in your terminal. It’s a path:
/Users/username/Library/Logs/cosma-cli/logs/20230503150704.htmlLocate this file and open it in your web browser. You can do this via your file explorer, or with your terminal: copy the path, then use the open command followed by the path.
open /Users/username/Library/Logs/cosma-cli/logs/20230503150704.htmlYou should see something like this:
Cosma - Log file - 202305031507:04
Errors (0 records)
Warnings (2 records)
Evergreen notes
- Type "concept" of "Evergreen note" unrecognized, treated as "undefined"
Evergreen notes should be atomic
- Type "insight" of "Evergreen notes should be atomic" unrecognized, treated as "undefined"
Cosma doesnt’t know about concept and insight because types have to be listed in the configuration. (We made you proceed despite the warnings on purpose, in order to show you where you can check warnings and errors.)
Addressing these warnings is easy. Open the config.yml file from cosma-test. Locate these lines:
record_types:
  undefined:
    fill: "#858585"
    stroke: "#858585"
This is the list of types. Each type is listed on a new line, with two spaces at the beginning of the line to indicate that it is a child of parameter record_types. Each type is defined by a name. Under that name are two properties, fill and stroke, which take a hexadecimal color code as their value. These colors are used in the output; they help distinguish between records of different types.
Let’s add our two types:
record_types:
  undefined:
    fill: "#858585"
    stroke: "#858585"
  concept:
    fill: "#984ea3"
    stroke: "#984ea3"
  insight:
    fill: "#ff7f00"
    stroke: "#ff7f00"
(Note that there are two or four spaces at the beginning of each line.)
Now, let’s go back to our terminal and run the cosma modelize command again. You can press the up-arrow key to call it back, then press Enter.
You should see the same message as before but without the warnings this time:
% cosma modelize
[Cosma v.2.0.0]  /Users/username/Documents/cosma-test/config.yml
Building cosmoscope… (source type: directory)
Cosmoscope generated (2 records)
Check the cosma-test directory. You should see a history subdirectory. This is created automatically by Cosma when the configuration contains history: true. The cosmoscope.html file in export is overwritten each time you run cosma modelize. But when history: true, Cosma also saves each cosmoscope in history. This allows you to check previous versions. Be careful though: it can also eat up a fair amount of disk space.
You should have two files in cosma-test/history, one for each time you ran cosma modelize. You can open both of these files in your web browser to check the difference between them: the first one (with the warnings) doesn’t include your types; the second one does.
3.2.5 Using a cosmoscope
With your web browser, open the cosmoscope.html file located in the export subdirectory of cosma-test. Let’s take a tour of the interface.
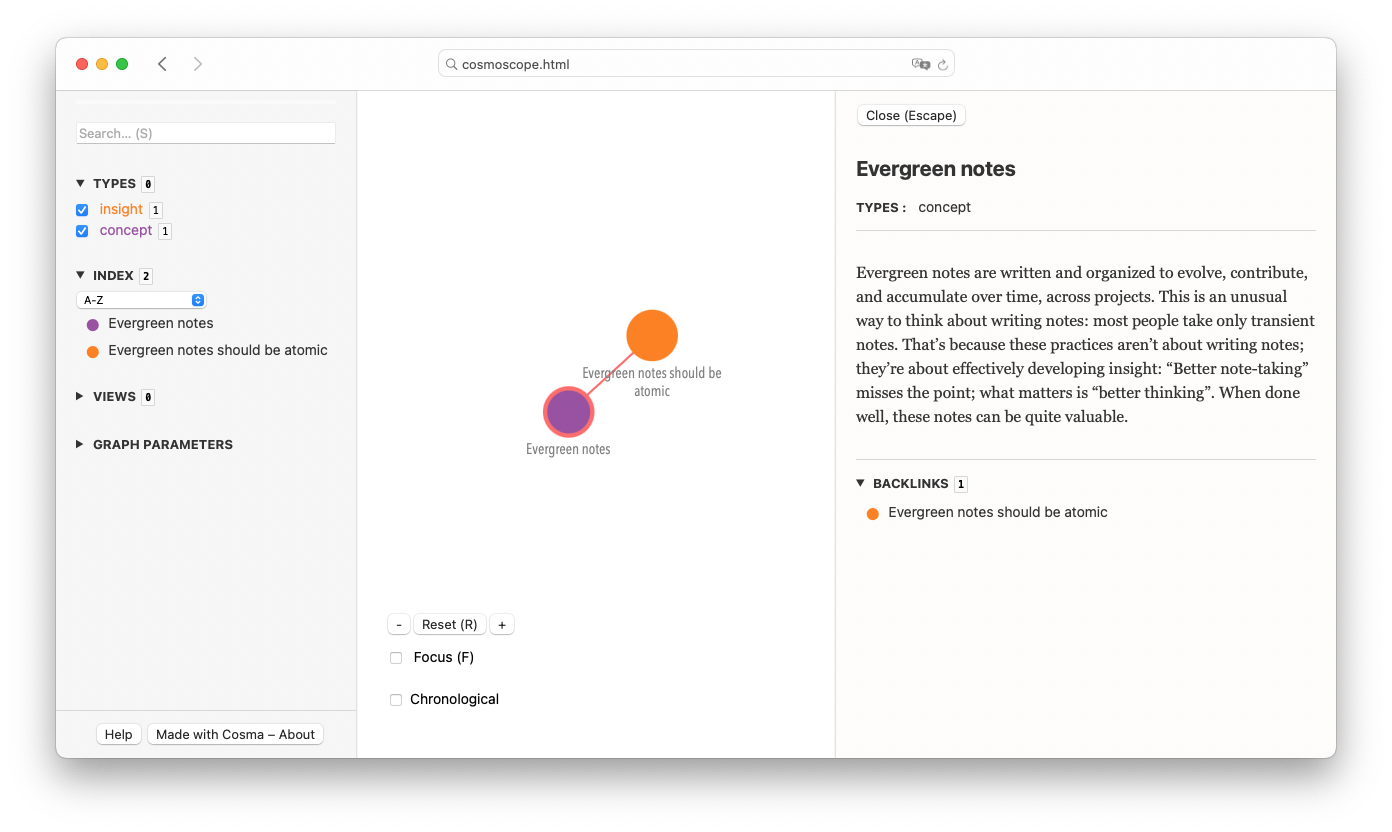
In the middle, you see a visual representation of your files as colored nodes, with links corresponding to the wiki links between them.
Clicking on a node opens a rightside panel which displays the contents of the file. At the bottom of this panel is a list of links and backlinks. Backlinks are the links that point to the record you’re currently viewing. Hover above this backlink and Cosma shows you its context in the corresponding record. Basically, it tells you where things are mentioned and how.
Here, “Evergreen notes” has a backlink from “Evergreen notes should be atomic”. If you need to write something on evergreen notes, you can review this record and check the backlinks to remind yourself of what you’ve written about this concept. This is one of the most important features of Cosma.
On the left is a navigation panel. The search box allows you to look up titles. The index is an alphabetical list of the records. Then there are display filters: the list of types for example allows you to hide or show all records of each type. This is not very useful when you only have two records, but if you get to a few hundred records, it can help you switch between a full graph and a more focused view. At the bottom left of the graph are other filters: Focus hides records not connected to the one which is currently selected; Chronological hides or shows records based on time metadata.
You can tweak the graph layout algorithm live from within the cosmoscope. Check “Graph parameters” in the panel on the left. These are reset every time you refresh the page. If you find settings you like, you can change the corresponding parameters in the configuration file; then run cosma modelize again to create a new version of the cosmoscope with these settings.
3.3 Creating a global project
For our second tutorial, we’re going to create a global project. We’re going to reuse our files from the previous tutorial and keep putting everything in the same cosma-test directory, except for one file: the configuration file. We’re going to create a new one in the Cosma user data directory. This will enable us to run cosma on this project from anywhere in the file system.
3.3.1 Setting up for global projects
Before you can create global projects, you have to create the Cosma user data directory. You only have to do this once.
Open a terminal. If you had one open from the previous tutorial, run cd (no argument) in order to go back to your home directory. You don’t need to be in a specific location for this, it’s just to start the tutorial with a fresh context.
Run cosma with this flag:
cosma --create-user-data-dirCosma will confirm the creation of the user data directory and show you its path. This path varies depending on your operating system. If you ever forget this path, run the above command again: Cosma will tell you the directory already exists and show you the path again.
Cosma can create global configuration files for you in the user data directory, but doesn’t overwrite or delete them. You can use this directory to store other files. Uninstalling Cosma doesn’t remove this directory.
3.3.2 Creating a global configuration file
Run the following command to create a new global configuration file for a project called cosma-test:
cosma config -g cosma-testCosma will confirm the creation of cosma-test.yml and show you its path.
Open cosma-test.yml with your text editor. You should see the same fifty-odd lines of YAML as when you created the local configuration file in the previous tutorial.
Let’s tell Cosma where the data is. We’ll reuse data from our cosma-test directory but this time, we’ll point to its absolute path:
files_origin: /Users/username/Documents/cosma-test/dataLet’s do the same for the export folder:
export_target: /Users/username/Documents/cosma-test/export/(Note the trailing slash for the export path.)
This time, let’s edit the list of types right away:
record_types:
  undefined:
    fill: "#858585"
    stroke: "#858585"
  concept:
    fill: "#984ea3"
    stroke: "#984ea3"
  insight:
    fill: "#ff7f00"
    stroke: "#ff7f00"
(You can copy paste this from the config.yml file from the previous tutorial but make sure that the indentation is correct: two spaces at the beginning of each line.)
Finally, let’s edit the title parameter. We’ll call this project “A test of Cosma”
title: 'A test of Cosma'3.3.3 Creating data (round two)
Let’s create a couple of files. We’re going to use cosma record but this time with the --project option followed by the configuration’s name:
cosma record --project cosma-testWhen Cosma asks you for the title, type Evergreen notes should be concept-oriented. Use insight for the type, and skip tags.
You’ve just created a file in cosma-test/data, without having had to move there. It did not matter where you were in the file system when you ran this command. You just had to remember the name cosma-test. This is the point of a global configuration: to be able to open a terminal and run cosma right away. Using the --project option is a bit like using a bookmark to visit a site rather than typing its URL.
Open the newly created file and add the following text. Don’t forget to replace the id accordingly.
It’s best to factor [[20230515104916|Evergreen notes]] by concept (rather than by author, book, event, project, topic, etc). This way, you discover connections across books and domains as you update and link to the note over time.(Note the link.)
Run the same command again (press up-arrow to retrieve it, then Enter). Use Evergreen notes should be densely linked as the title, insight as the type, and skip tags.
Open the newly created file and add the following text (again, replace the id accordingly):
If we push ourselves to add lots of links between our notes, that makes us think expansively about what other concepts might be related to what we’re thinking about. It creates pressure to think carefully about how ideas relate to each other (see [[20230515110033|Evergreen notes should be concept-oriented]]). It’ll also help you internalize the ideas more deeply.3.3.4 Creating a cosmoscope (round two)
Run the following command:
cosma modelize --project cosma-testYour terminal should look like this:
% cosma modelize --project cosma-test
[Cosma v.2.0.0] A test of Cosma /Users/username/Documents/cosma-test/config.yml
Building cosmoscope… (source type: directory)
Cosmoscope generated (4 records)
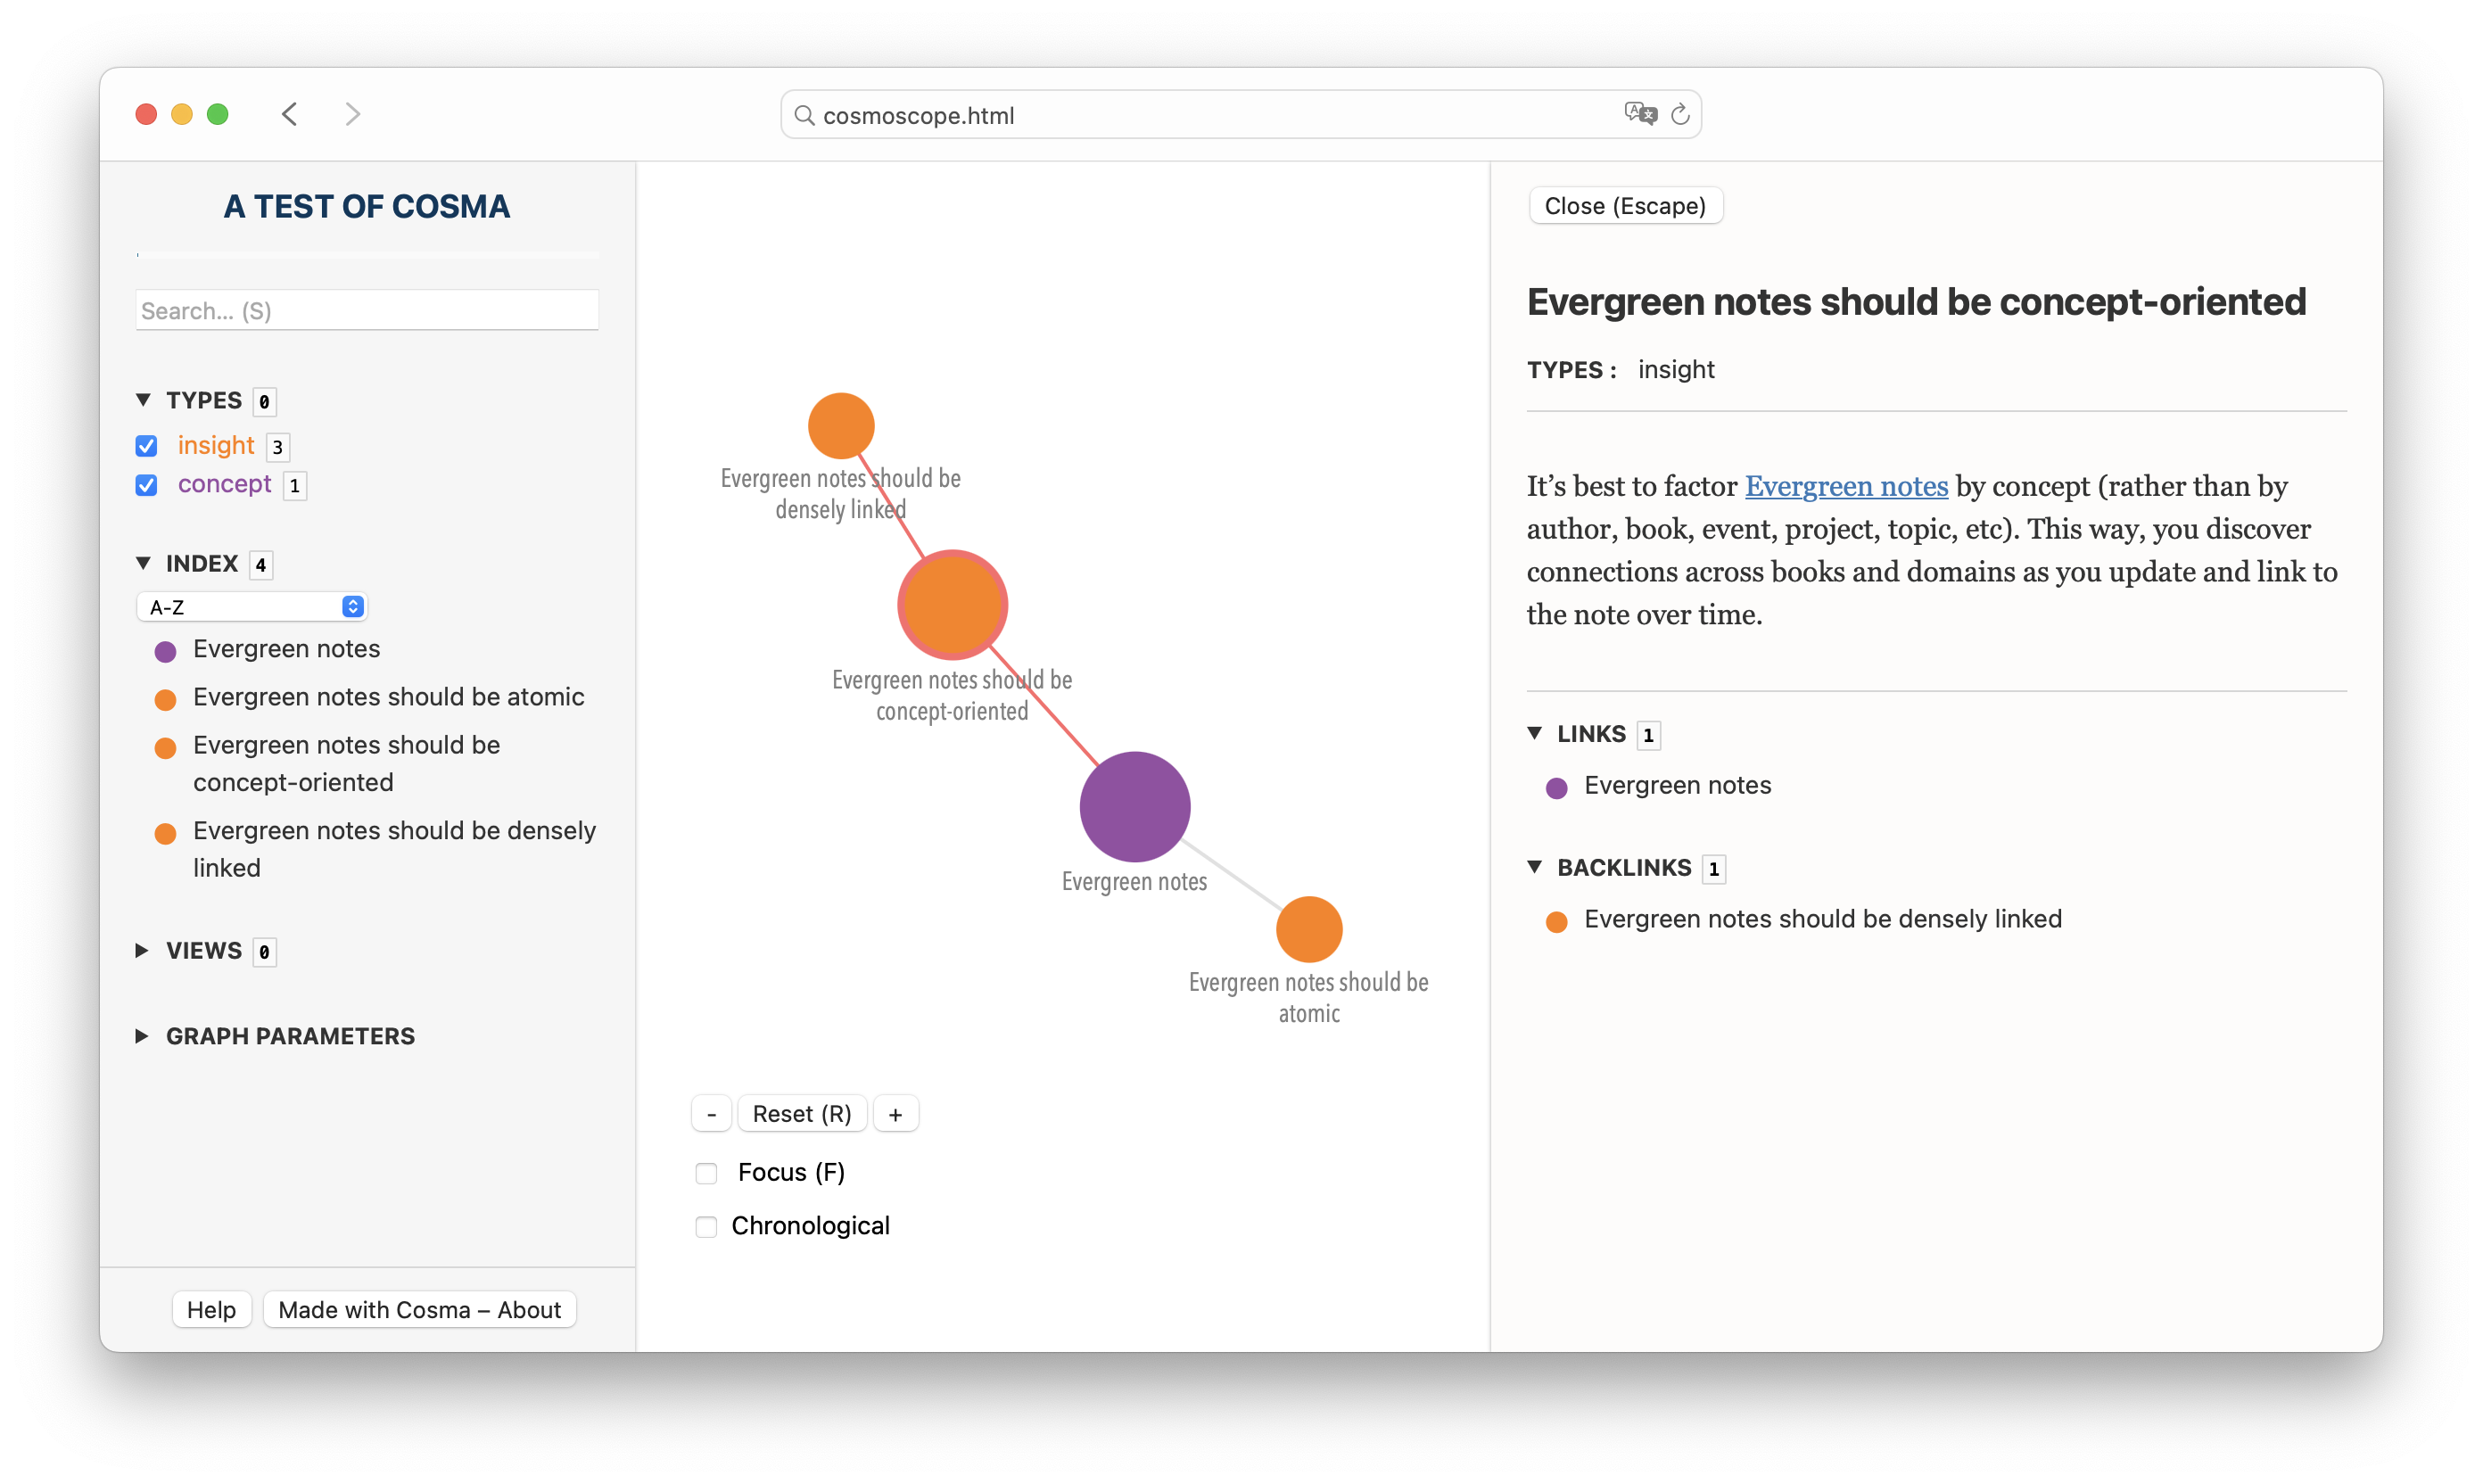
Note the number of records, as well as the fact that Cosma picked up on your project’s title and displayed it.
With your web browser, open the cosmoscope.html file from cosma-test/export. There should be two more records, and the title “A test of Cosma” at the top left of the interface.
3.4 Wrapping up
Let’s review what we’ve done:
- we set up a folder with input files;
- we created and edited a local configuration file;
- we created Markdown files and linked them;
- we created a cosmoscope to visualize our files in a web browser;
- we created and edited a global configuration file that reused the same data.
Before you move on, let’s close on a few important words about the flexibility of Cosma’s configuration process.
In these tutorials, we created a local configuration and a global configuration that point to the same data source and export target. But configurations are independent of each other; they depend only on the paths to which they point. You may have several configurations that use the same data in different ways, but most of the time, each data source will have its own configuration, global or local, depending on your preference, without there being the need for both.
Putting every file related to a project into a neatly organized directory is convenient and allows the folder to be moved without breaking the configuration. With a local configuration file, this makes the project completely portable: great for syncing across computers, whether it’s because you use several machines or because this is a collaborative project.
But you might prefer having files located in several places. When you’re working alone on just one computer, some files (like bibliographical data or custom CSS) can end up used in multiple projects, and you may want to avoid duplicating them. So rather than self-contained projects with local configurations, you’ll probably use global configuration files that point to files stored in different places, with the same paths being used in multiple projects. The defaults.yml file facilitates this; check the User manual for more information.
What’s next?
If you’ve just discovered terminals, plain text and Cosma on the same day, honestly, congratulations!
If you feel ready to apply Cosma to your work, great! We hope you find it useful. If you have any questions, check the User manual and the Help page.
If you’re interested in the following:
- using titles instead of identifiers for links;
- using CSV for input instead of Markdown (via Google Sheets for instance);
- adding citations and automatically-generated bibliographies;
- customizing the cosmoscope with CSS;
Then read on!
4 Advanced tutorials
🚧 Work in progress
4.1 Using titles for linking
Starting from version 2.1, you can choose whether to use identifiers or titles for linking files.
If a file has e.g. title: Evergreen notes and no id parameter, then it can be linked to based on its title.
Files with or without id can coexist in the same project. But a file must not have an id if you want to link to it based on its title.
Text case is ignored when parsing but preserved when rendering, so you can write [[Evergreen notes]], [[evergreen notes]] or even [[eVerGReeN NotEs]]: the link will work regardless, with the text being rendered the way you wrote it.
A new required parameter has been added to the configuration: generate_id. It modifies the behavior of cosma record according to three values:
- when
generate_id: always,cosma recordautomatically generates identifiers in new files (this is the default setting); - when
generate_id: never,cosma recorddoesn’t add identifiers in new files; - when
generate_id: ask,cosma recordasks you to typey(yes) orn(no) for each new file to choose if you want an identifier to be automatically added or not.
If you followed the tutorials in the previous section, you should have a cosma-test folder. Duplicate it and rename the copy cosma-title-links.
Modify the files in cosma-title-links/data:
- remove their
idfield - rewrite the links by removing the identifiers and the pipe
|symbol.
For instance, your evergreen-notes-should-be-atomic.md file should now look like this:
---
title: Evergreen notes should be atomic
type: insight
---

[[Evergreen notes]] should be atomic. It’s best to create notes which are only about one thing—but which, as much as possible, capture the entirety of that thing.
In your terminal, move to cosma-title-links and run cosma modelize to generate a cosmoscope. Open it and check the links: everything should look the same as within the cosmoscope from the cosma-test project.
If you want to create additional files in this project, and have them without identifiers, open cosma-title-links/config.yml and set generate_id to never. Then use cosma record as usual to create new files: these won’t have an id field in their YAML header.
4.2 Using CSV for input
🚧 Coming soon
4.3 Adding and processing citations
🚧 Coming soon
4.4 Customizing the cosmoscope with CSS
🚧 Coming soon